All in one seo configuration
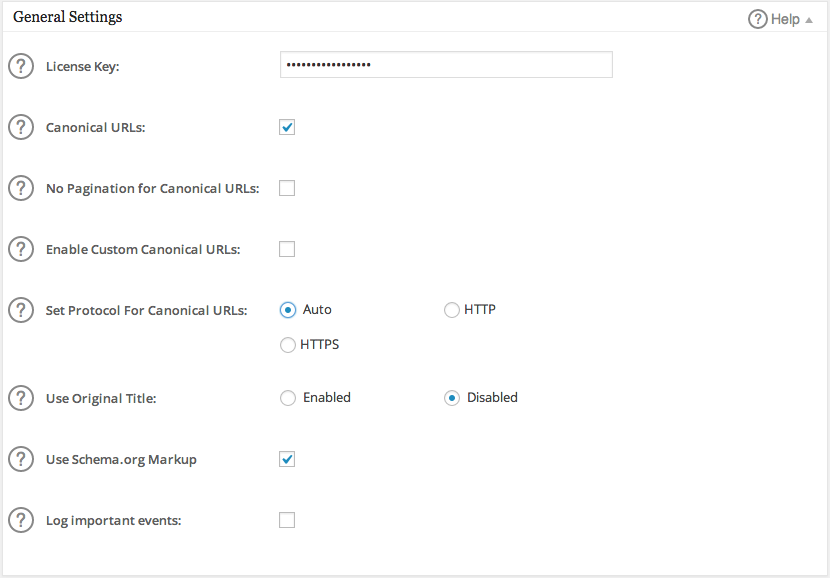
General setting
Canonical URLs
This setting is checked by default. This is because the Canonical URLs setting protects you from being punished by Google for duplicate content, or having multiple URLs leading to the same content. The link in the inline help within the plugin takes you to this post on the Google Webmaster Central Blog which details the issues Googlebot faces with indexing duplicate content and how to avoid it. Remember, having this box checked helps you follow Google’s rules.
No Pagination for Canonical URLs
This option was added for those users who want to remove the pagination from Canonical URLs. Typically the Canonical URL for a paginated page or post will be displayed at http://mydomain.com/page/2/. This option removes the /page/2/ from the Canonical URL.
Enable Custom Canonical URLs
When checked, this option will add a new field to the All in One SEO Pack box on the Edit Post / Edit Page screen where you can set a custom canonical URL for that Post/Page.
Set Protocol For Canonical URLs
This setting lets you specify the protocol that will be used for the Canonical URLs in your source code. If you select Auto, All in One SEO Pack uses the get_permalink() function in WordPress so the protocol used will be the protocol specified in your wp-config.php file.
Use Original Title
This setting is disabled by default. You may need to enable this if your theme or other active plugins on your site are interfering with All in One SEO Pack writing the Title tags on your site.
User Schema.org Markup
This option was added for those users who do not want All in One SEO Pack outputting any Schema.org markup on their site. We are gradually adding more support throughout the plugin for Schema.org markup because this markup is what provides search engines with the information so that they can display rich snippets. However, the W3C HTML Validation Tool does not support this new markup and will return errors when it sees this markup on a site. These errors can safely be ignored, they don’t affect the operation of a site or the SEO or ranking on search engines. However, for those who prefer clean HTML markup that passes the W3C Validator and are willing to sacrifice rich snippets in search results, this option will remove any Schema.org markup output by All in One SEO Pack. This option is checked by default because for SEO purposes Schema.org markup is good.
Log Important Events
The Log Important Events option generates a log file of events occurring within the All in One SEO Pack plugin. This is mainly used for debugging and reporting and can be safely left unchecked unless instructed to check it by our Support Team in our Premium Support Forums.
Home Page Setting
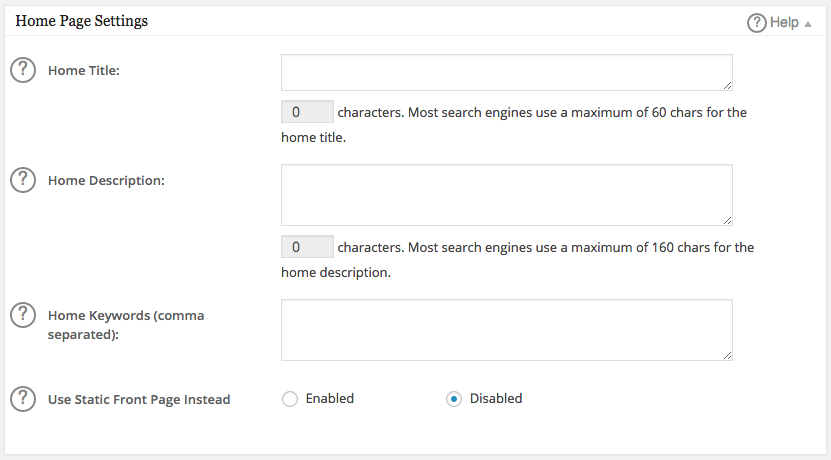
Home Title
The Home Title is the SEO Meta Title for the home page on your site. The Meta Title of your Home Page will appear in the top of the browser and in the source of your home page between the <title> tags. This is the title that the search engines will display in their search results as the link to your site so it’s important to keep this simple (60 characters or less) and relevant. Whatever you enter in this field is output directly to the source code of your home page. It is used regardless of whether you are displaying the latest blog posts on your home page or have a static home page (controlled under Settings, Reading in the main WordPress menu).
Home Description
The Home Description is the Meta Description for the home page on your site. This is the description that the search engines will display in their search results, it will show beneath the title in search results. Keep the description short (160 characters or less) and relevant (real sentences, not crazy keyword combinations). The Meta Description is a suggestion, some search engines such as Google will sometimes create their own description of your content and display that in the search results instead of your Meta Description. Read our documentation on Meta Descriptions for more information.
Whatever you enter in this field is output directly to the source code of your home page. It is used regardless of whether you are displaying the latest blog posts on your home page or have a static home page (controlled under Settings, Reading in the main WordPress menu).
In the screenshots below you can see how the Home Title and Home Description for our site shows up in Google search results based on what we entered in the All in One SEO Pack settings.
Home Keywords
Meta Keywords hold little or no value in today’s SEO. This post from Matt Cutts at Google explains why they no longer value them. However you may feel differently and wish to use them.
It is tempting to go overboard and add hundreds of possible word combinations, but try to keep the amount of keywords you use to a reasonable level. Use the most important words in regards to your site and area of expertise.
Remember, Meta Data serves two purposes:
It tells search engines what your site is about
It shows up in search results, which tells people what your site is about
The Meta Title and Meta Description are what people see in search results that helps them determine whether or not to click to visit your site. High rankings are meaningless if nobody clicks on the links because the Meta Data isn’t helpful or meaningful.
Keyword setting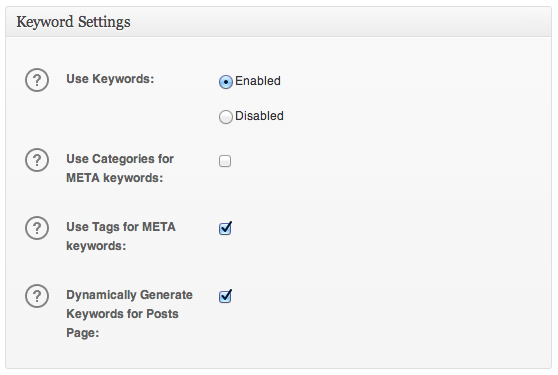
Use Keywords
Meta Keywords hold little or no value in today’s SEO. This post from Matt Cutts at Google explains why they no longer value them. However you may feel differently and wish to use them.
If you do not wish to use Meta Keywords on your site you can stop these fields from appearing in All in One SEO Pack by selecting Disabled next to Use Keywords.
Use Categories for META Keywords
This setting is left unchecked by default in an effort to keep the amount of Meta Keywords you use down. If you’re not planning to add many Meta Keywords to your Posts then this is a very convenient option for you. Simply check this box and All in One SEO Pack will use the names of any Categories that your Post belongs to as Meta Keywords for that Post.
Use Tags for META Keywords
This setting is checked by default, this is because Tags in WordPress behave more like Meta Keywords for a Post. All in One SEO Pack will use the Tags for your Post asMeta Keywords for that Post.
Dynamically Generate Keywords for Posts Page
Use this setting if you want your Meta Keywords for your blog page (controlled under Settings, Reading) to be dynamically generated from the Meta Keywords of the Posts displayed on your blog page. If you leave this unchecked, All in One SEO Pack will use the Meta Keywords set in the Edit Page screen for your blog page.
Title Setting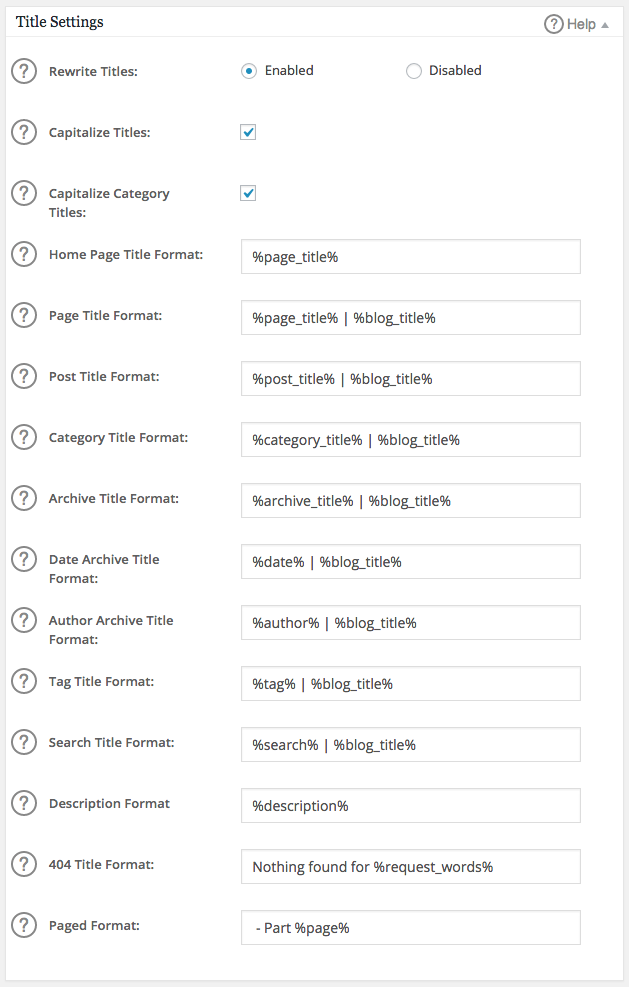
Rewrite Titles
This refers to the Meta Title tag that is displayed in the browser tab and in the source of your Page between the <title> tags. It is enabled by default and the formats shown in the Format fields below control how they will appear (see below).
Capitalize Titles / Capitalize Category Titles
These settings are checked by default and control whether Meta Titles will be capitalized. Check them if you want each word in a Page Title, Tag Archive Title, or Category Archive Title to be capitalized.
Title Format Fields
The Format fields control how your Meta Titles will be formatted for each type of content. These settings can be changed if you wish. The supported formats are shown in the inline documentation for each field. Leaving them as default would, for example, output a Meta Title for a Page as “Page Title | Site Title”.
Custom card type setting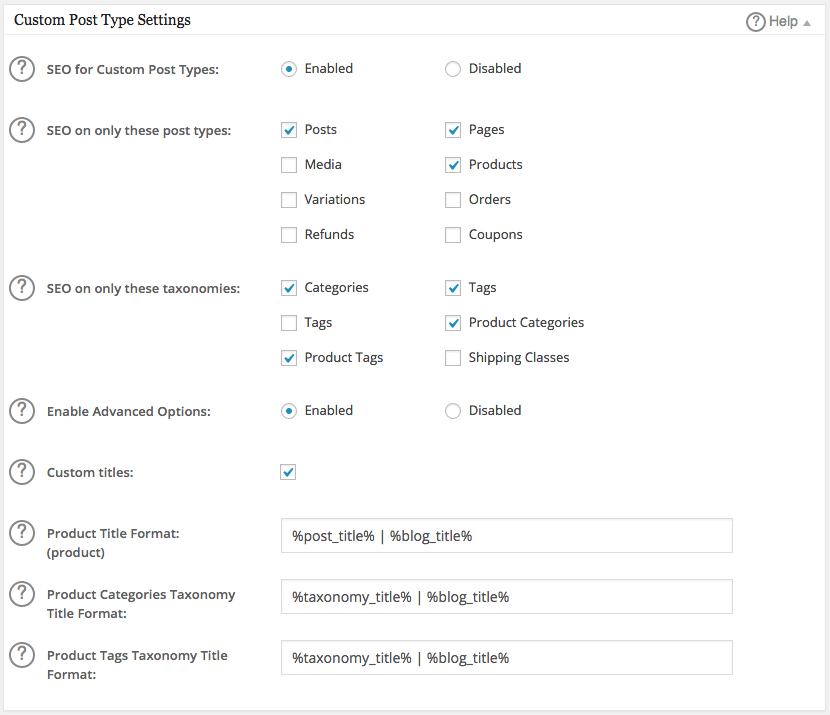
SEO for Custom Post Types
The default setting for this is Enabled, this is so that All in One SEO Pack will work for any Custom Post Type that may be created by your theme or active plugins. If you do not want to use All in One SEO Pack Pro with any Custom Posts Types on your site then select Disabled and click the Update Options button at the top or bottom of the screen.
SEO On Only These Post Types
Here you can select which Custom Post Types you want All in One SEO Pack to work with by checking or unchecking the boxes next to each Post Type. By default, only the standard WordPress post types of Posts and Pages are checked.
SEO On Only These Taxonomies
Here you can select which Taxonomies you want All in One SEO Pack to work with by checking or unchecking the boxes next to each Taxonomy. By default, only the standard WordPress Taxonomies of Categories and Tags are checked.
Enable Advanced Options
Enabling the Advanced Options will display advanced options for controlling Custom Post Type and Custom Taxonomy title formats.
Custom Titles
Custom Titles gives you the option to manually set the format for the Title tags for each of your Custom Post Types and Custom Taxonomies.
Display setting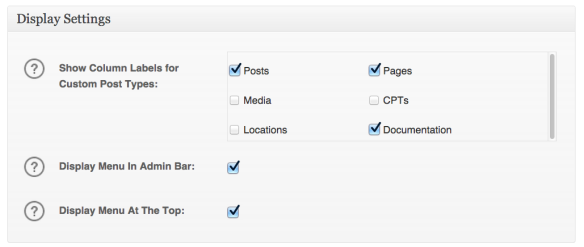
Show Column Labels for Custom Post Types
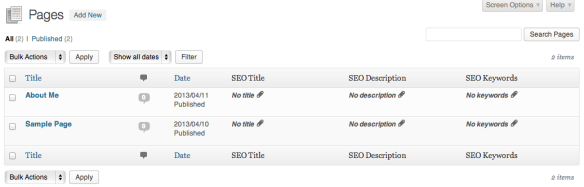
This controls which screens display the SEO Title, SEO Keywords and SEO Description columns. These columns give you an overview of which content you have added SEO Meta Titles, Meta Keywords and Meta Descriptions to. See the documentation on Posts/Pages Table Settings.
 By default, only the Posts and Pages boxes are checked, but you can select any other Post Types that you want and these columns will be added to the table. As you create Custom Post Types, more check boxes will appear here.
Display Menu in Admin Bar
This setting is checked by default and will add an SEO menu item to the Admin Bar which shows at the very top of your screen. This allows for easy access to the settings in All in One SEO Pack. If you do not want to access All in One SEO Pack from the Admin Bar, uncheck this box.
Display Menu At The Top
This setting allows you to change where the All in One SEO Pack menu item will apear in the WordPress Dashboard menu. Checking this box will display the All in One SEO Pack menu item at the top of the WordPress Dashboard menu underneath Dashboard. Uncheck it if you would like it to be displayed below the Settings menu item.
If you use Google Webmaster Tools to monitor how Google sees your web
site this is a convenient way of authenticating your site with Google Webmaster Tools.First, add your site to Google Webmaster Tools. After entering your Domain Name you will be taken to a screen that shows Recommended Methods and Alternate Methods of verification. Click on the Alternate Methods tab and select the HTML tag option.
A unique meta tag will be generated, copy only the randomly generated number from the code (see screenshot below) not the entire tag and leave this page open. We will be coming back here to verify your site.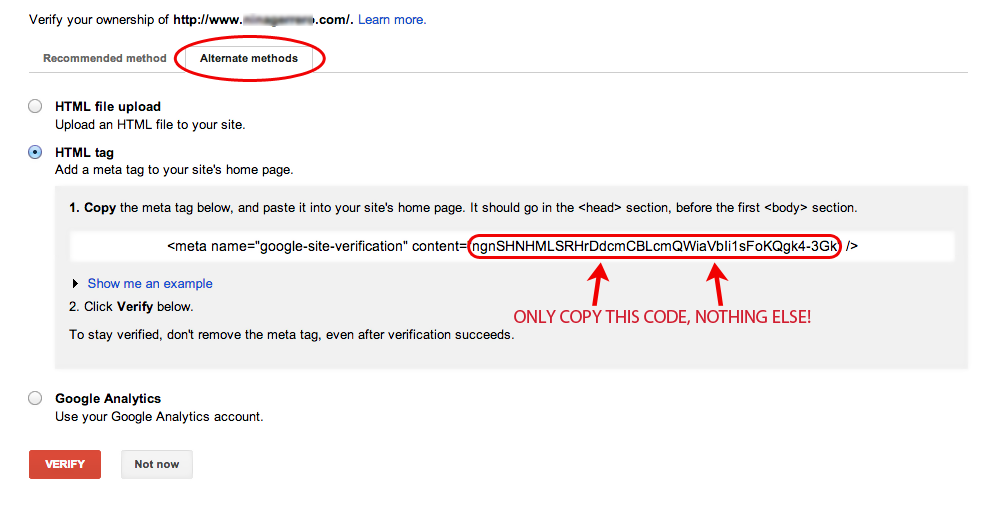 Now, head over to your site and go the All in One SEO Pack General Settings screen. Scroll down to the Webmaster Verification section and paste the code into the Google Webmaster Tools field. Make sure you do not include any quotes. Scroll to the bottom of the page and click Update Options.
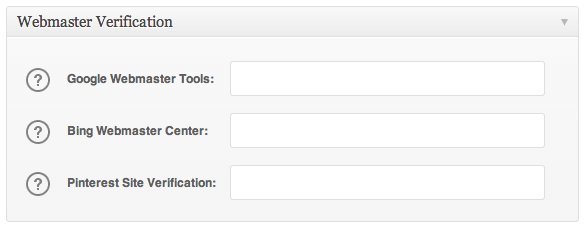 Go back to the Google Webmaster Tools page that you left open from before and c
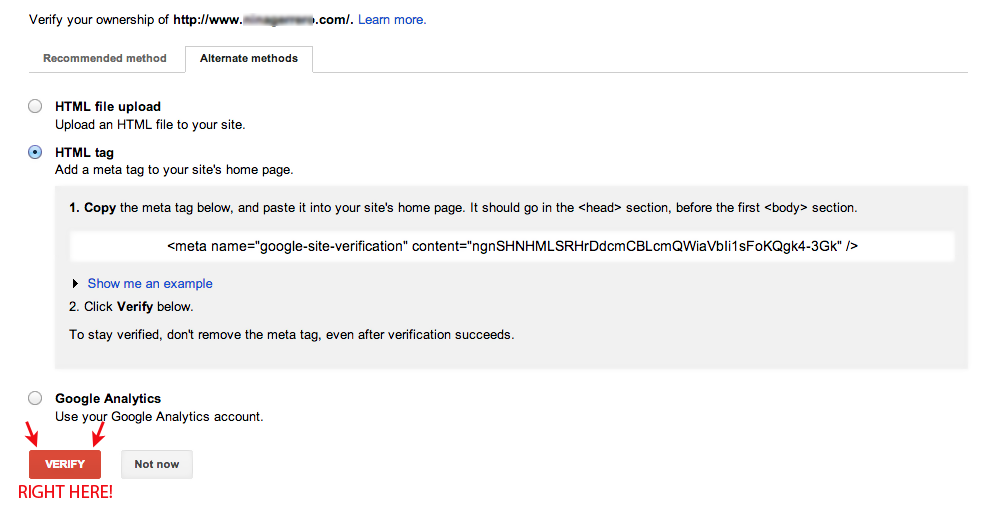 That’s it! Google has now verified your site and you’re free to browse through the different options and information that Google Webmaster Tools have to offer you as a site owner.
 Bing Webmaster Verification
In order to verify your site with Bing Webmaster Tools you will first have to sign in to Bing with any Microsoft account.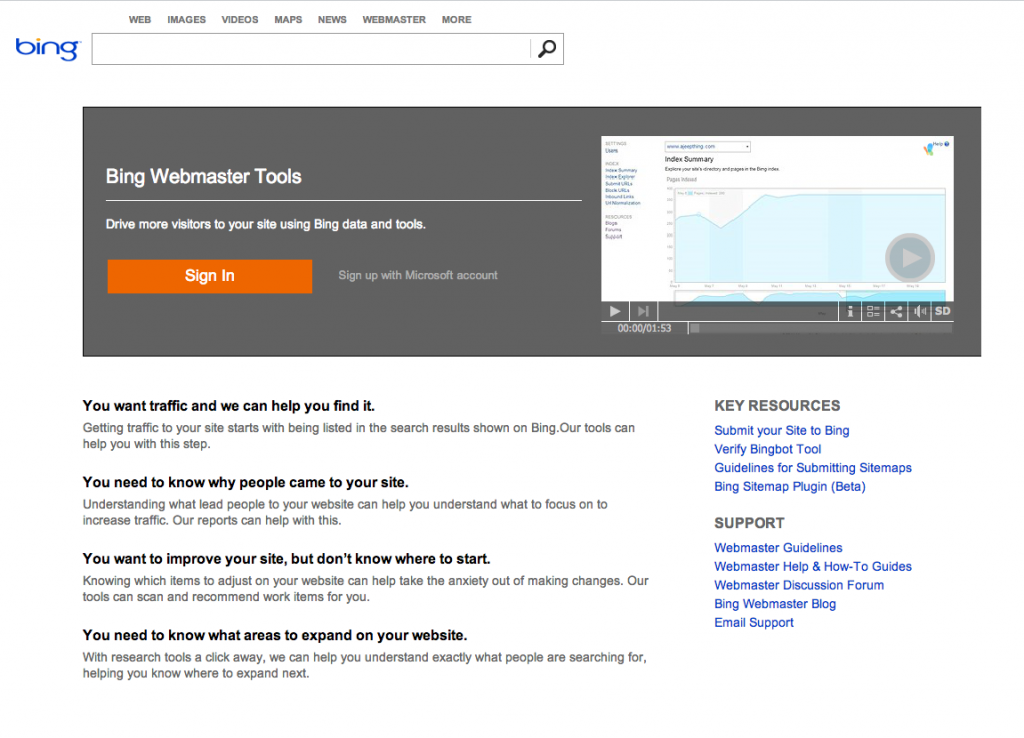 Once you have signed in you will be taken to the Dashboard for Bing Webmaster Tools. Now click the Add Your Site box in the center of the page
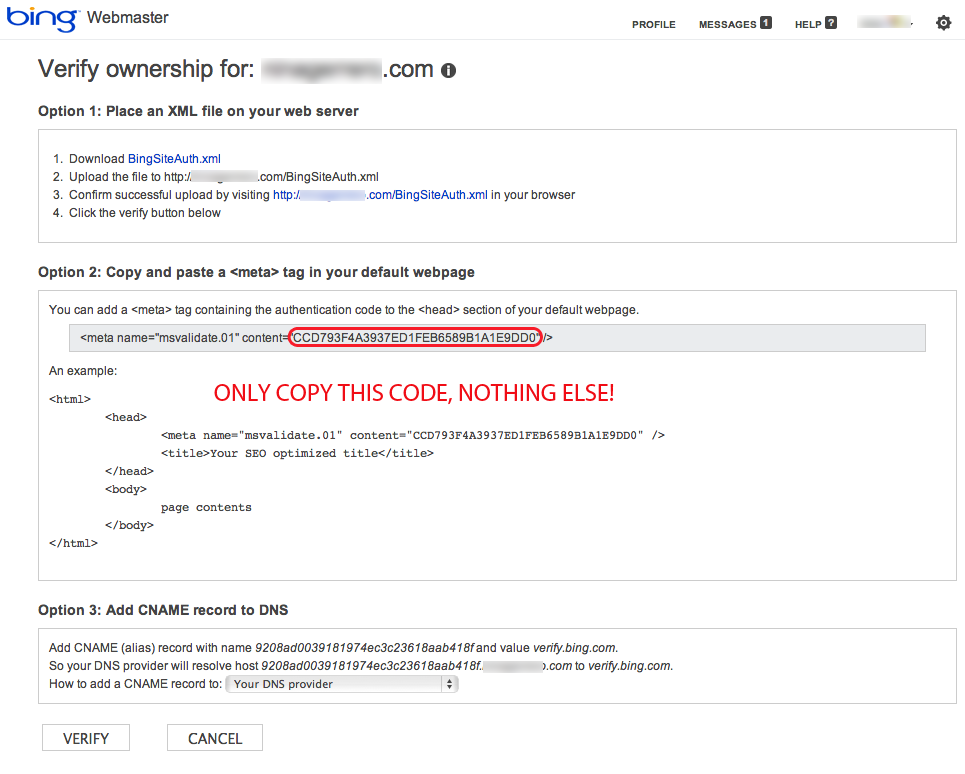
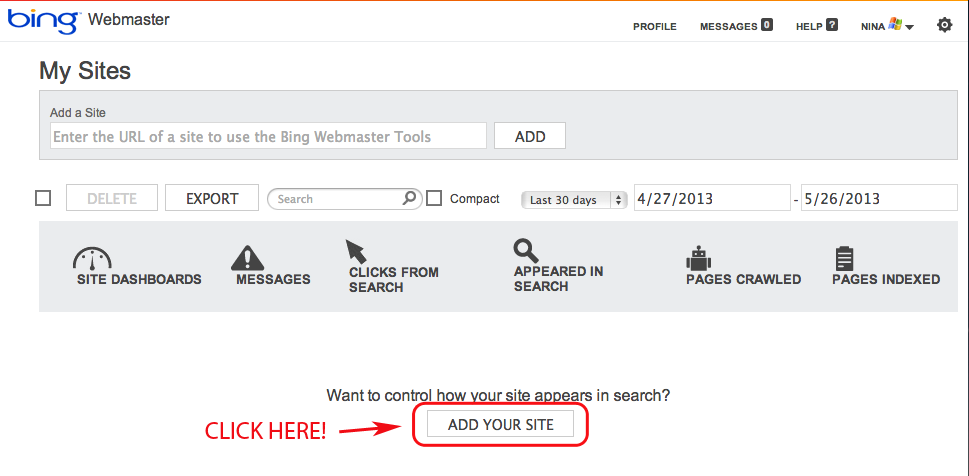 You will have to enter some information about your site and then you’ll be taken to a page with a meta tag to copy. Only copy what is circled in the screenshot below, you don’t need the entire tag.
Leave this page open, you will be coming back to it to verify your site.
Once you’ve copied that meta tag, go back to your WordPress site and paste it into the Bing Webmaster Verification field on the General Settings screen of All in One SEO Pack, then scroll to the top or bottom of the page and click Update Options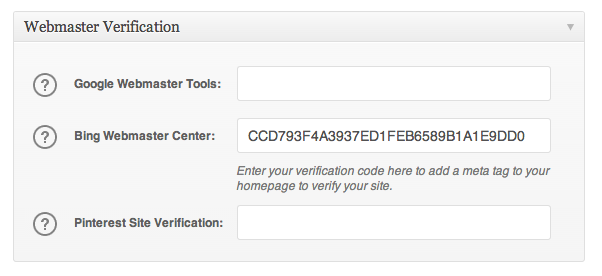 Now, go back to the Bing Webmaster Tools page that you got the code from and click Verify
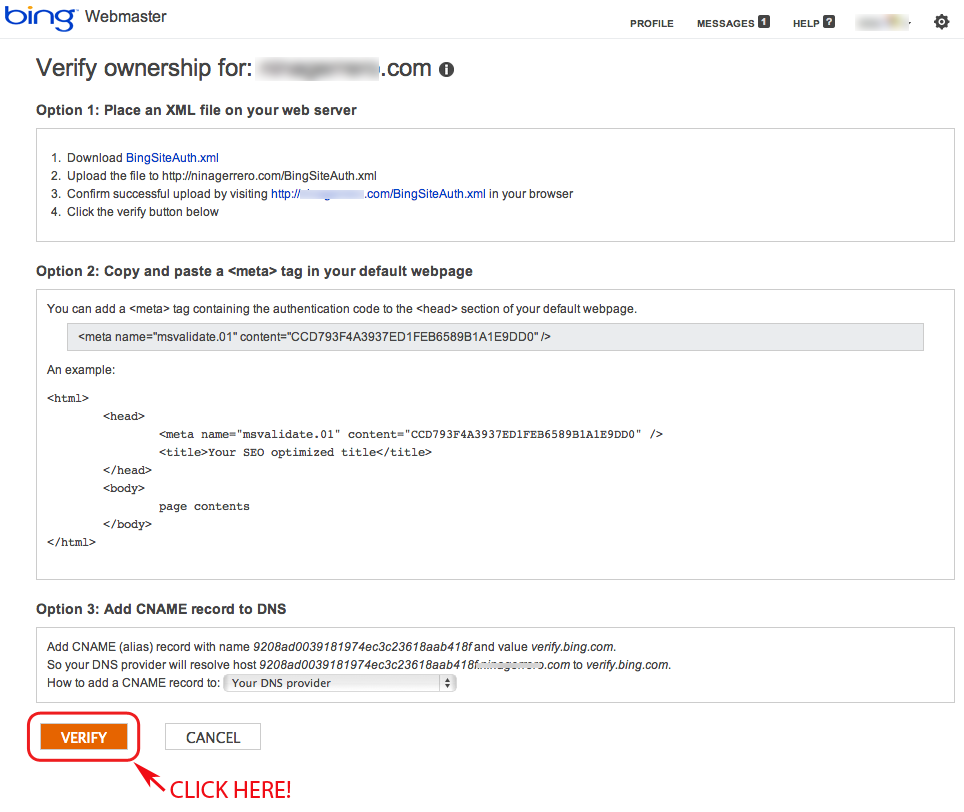 That’s it! You should now be taken to a dashboard where you can access all the Webmaster Tools that Bing offers.
Pinterest offers site verification to it’s users and All in One SEO Pack makes it easy to get your site verified with Pinterest.
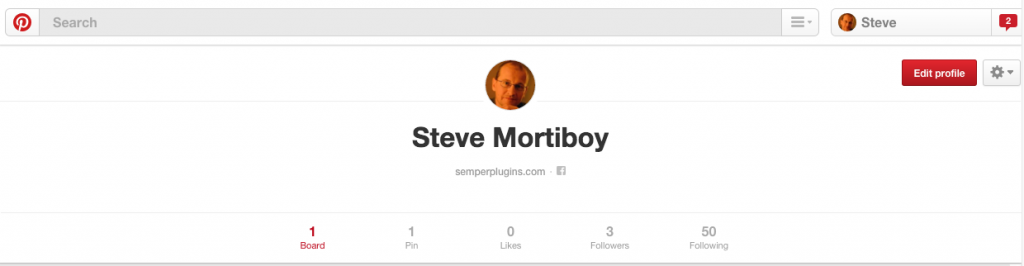
First, you’ll need to sign in to your Pinterest Account. Go to your Profile and click the Edit Profile button.
 This will launch an Edit Profile popup. Here you have the option of adding your website. Add your site and click the Confirm Website button. In the Confirm your website popup box, you will see a Meta Tag like the one shown below
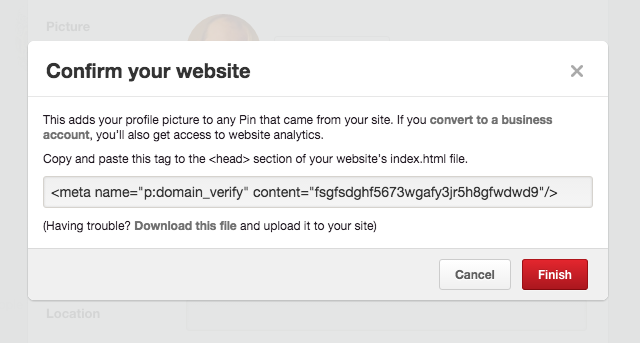 Copy the code between the double quotes after the word content=. Leave this screen open, you will need to come back here to complete the verification.
Now switch over to the General Settings screen in All in One SEO Pack and paste the code you’ve just copied into the Pinterest Site Verification field in the Webmaster Verification section so that it looks like the screenshot belo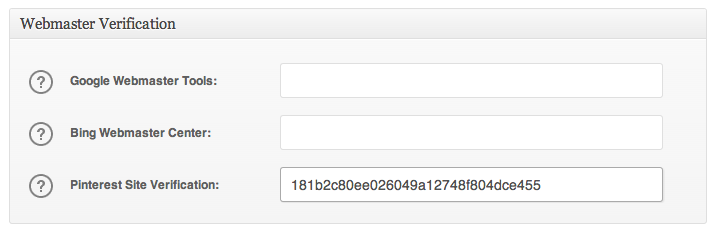 Scroll to the bottom or top of the page and click Update Options.
Now, head back to the Pinterest page that you left open and click the Finish button and then the Save button.
That’s it! Your site is now verified with Pinterest.
Google Setting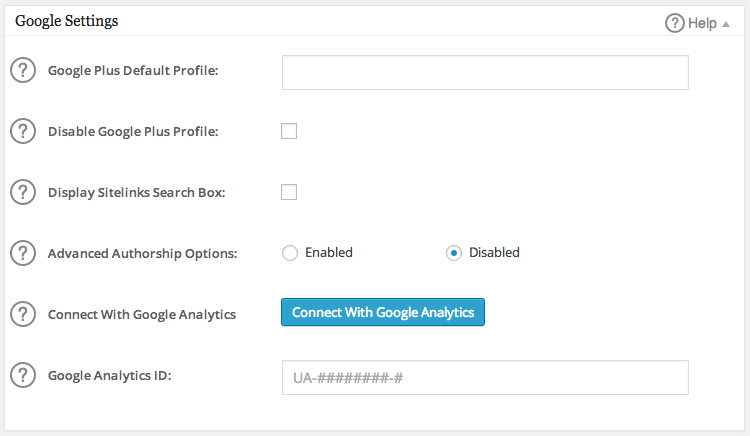
Google Plus Default Profile
Google recently piloted the display of author information in search results to help users discover great content. As at August 2014 Google dropped support for authorship in search results. However, there may be other benefits to including Google author and publisher markup on a site.
All in One SEO Pack enables you to add your Google+ profile as the author markup on your site by entering the URL for your Google+ profile. There are two locations where you can set this information, these are:
There is a Google Plus Default Profile field where you can enter the Google+ profile for the owner of the site. This will be users as the default author profile for all content unless you specify a Google+ profile for each of your content authors.
All in One SEO Pack adds a Google+ field to the Edit User screen which can be found under Users in WordPress. The Google+ profile you enter here will be used on any post or page authored by this user. This overrides the default Google+ profile entered in the Google Settings box on the General Settings screen.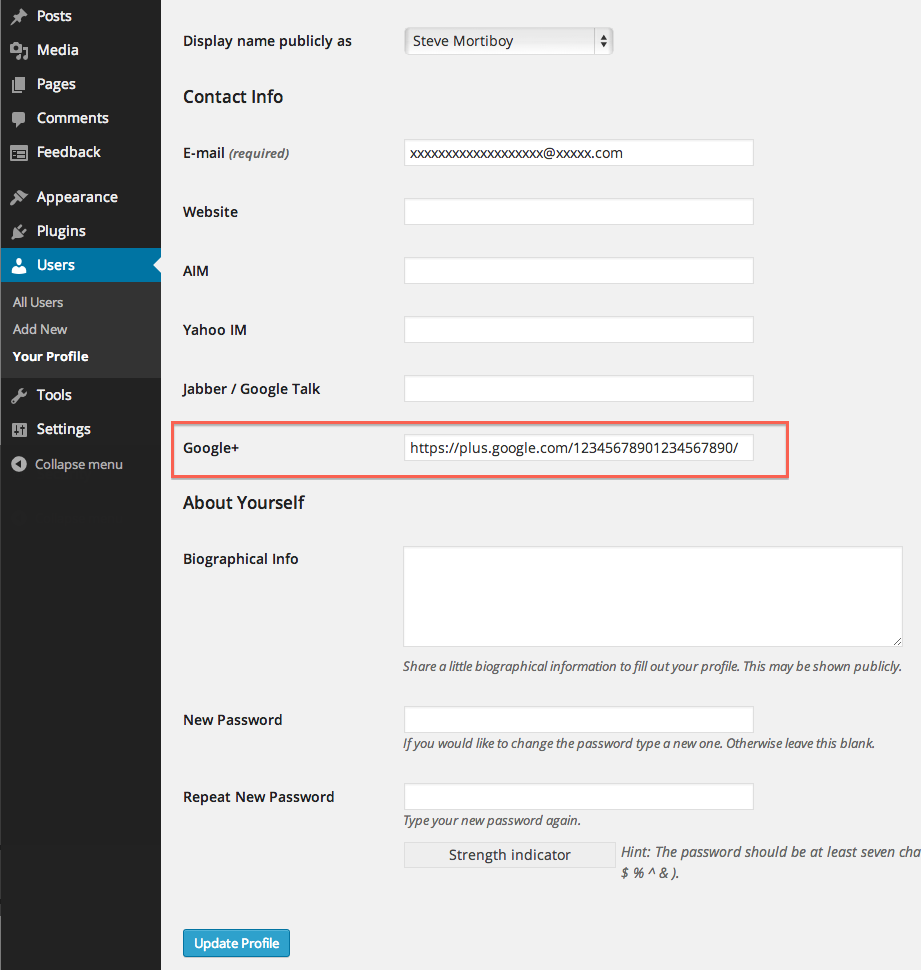
Disable Google Plus Profile
If you don’t want the Google+ field displayed in the Edit User screen then you can disable it by checking the box titled “Disable Google Plus Profile”. For example, if you have a membership site and you don’t want your members seeing the Google+ field in their User Profile then you can disable it using this option.
Display Sitelinks Search Box
This option will output the code required for the Sitelinks Search Box that Google may display in search results. You can read more about the Sitelinks Search Box on Google’s website here.
Note that Google uses a variety of factors to determine when the Sitelinks Search Box appears, including the information on your site and different types of queries from Google Search users.
Advanced Authorship Options
Select Enabled to enable the Advanced Authorship Options within All in One SEO Pack. These options are detailed in the sections below.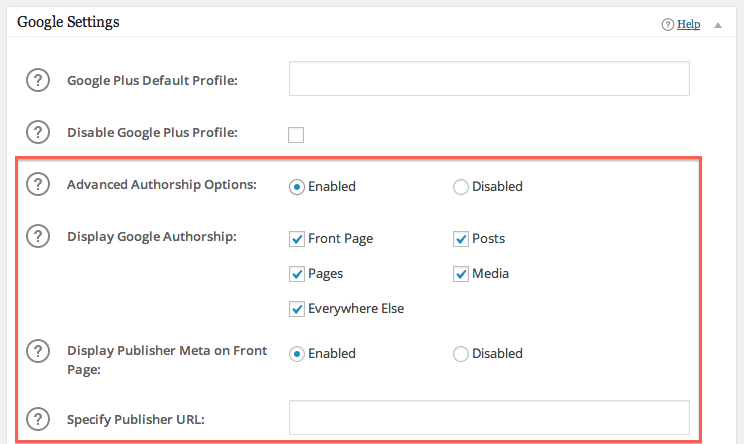
Display Google Authorship
This option lets you control where authorship is displayed. You can select whether to display the rel=”author” tag on your Home/Front page, on Posts, Pages, Custom Post Types, Media attachment pages, or everywhere else which encompasses 404, search, categories, tags, custom taxonomies, date archives, author archives or any other type of page.
Display Publisher Meta on Front Page
This option lets you control whether you want to display the rel=”publisher” tag on your Home/Front page. According to the advice from Google on their blog, they recommend using rel=”publisher” to “create a shared identity by linking your business’ website (homepage) to your business’ Google+ page”. This article can be found here.
Specify Publisher URL
This is the field where you can enter the Google+ profile URL that will be used for the rel=”publisher” tag. According to the advice from Google on their blog, they recommend using your business’ Google+ page for the rel=”publisher” tag. This article can be found here.
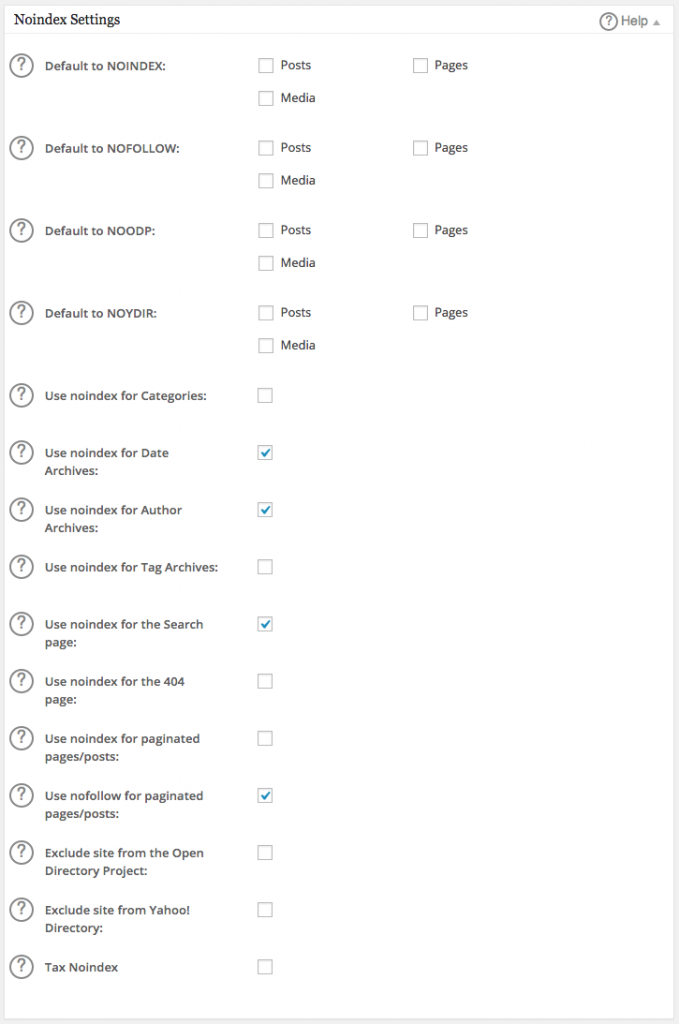
NOINDEX is a meta tag that can be displayed to search robots that requests them not to index content. The specific directive differs between each search robot. For example, the directive it gives Google’s search robots is Do not show this page in search results and do not show a “Cached” link in search results. Other search robots interpretation may be different.
NOFOLLOW is a meta tag that can be displayed to search robots that requests them not to follow any links in the content. This can be especially useful when either you do not want search engines to follow links to certain content on your site, or more importantly when you do not want search engines to follow outbound links to other people’s websites.
In the Noindex Settings box in All in One SEO Pack you can control the default settings for NOINDEX, NOFOLLOW, NOODP and NOYDIR for the different types of content on your site. This includes:
Check the applicable box to set the NOINDEX, NOFOLLOW, NOODP and NOYDIR meta tag for each type of content. This setting can be overridden on specific posts, pages, custom posts, categories, tags and custom taxonomies.
Use Noindex for the 404 page
This option will set the NOINDEX tag on the 404 page. This may not work on all themes, it will depend on whether the theme has a static 404 page or dynamically generates the 404 page.
Use Noindex for Paginated Pages/Posts
This option will set the NOINDEX tag on all paginated content, for example http://mydomain.com/page/2/ would have the NOINDEX tag but http://mydomain.com/ would not. This is for those who don’t want paginated content to be indexed separately by search engines but instead only the first page be indexed.
Use Nofollow for Paginated Pages/Posts
This option will set the NOFOLLOW tag on all paginated content, for example http://mydomain.com/page/2/ would have the NOFOLLOW tag but http://mydomain.com/ would not. This is for those who don’t want search engines to follow links on paginated content.
Exclude Site from the Open Directory Project
This option will set the NOODP tag on all content. This is for those who don’t want Google and other search engines to use titles and descriptions about their site from the Open Directory Project (DMOZ).
Exclude Site from Yahoo Directory
This option will set the NOYDIR tag on all content. This is for those who don’t want Google and other search engines to use titles and descriptions about their site from the Yahoo Directory.
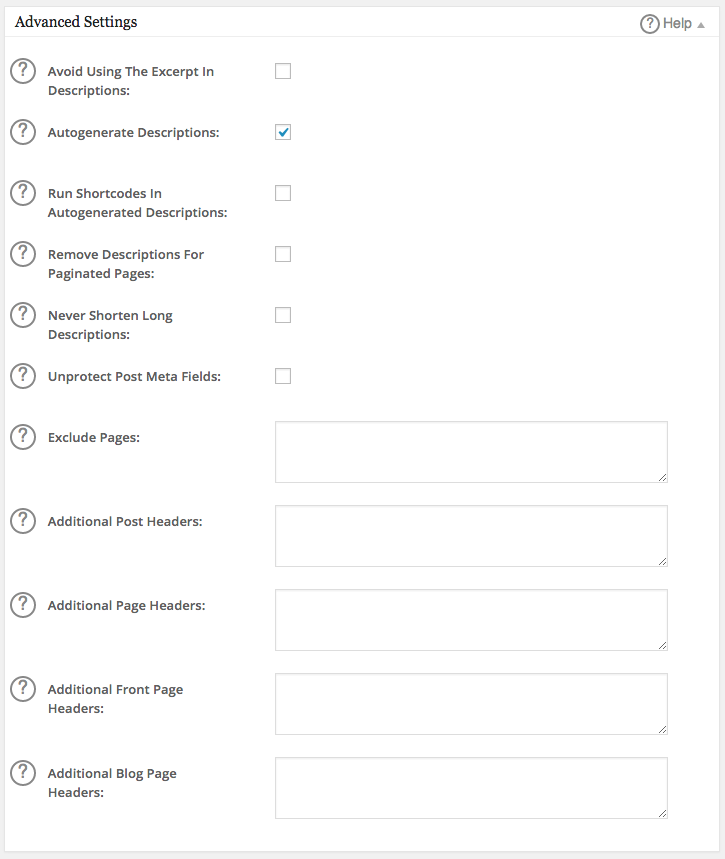
Advanced setting
Avoid Using The Excerpt in Descriptions
By default, All in One SEO Pack will use the excerpt from a post as the autogenerated description and then fall back to using the content if an excerpt is not present. Some users may want to change this behavior using this setting.
Autogenerate Descriptions
The Autogenerate Descriptions setting will autogenerate a Meta Description for anyPost Type using the first 160 characters of the content. If you write a great opening paragraph in your content for a Page or Post then you may wish to use this as your Meta Description, in which case leave the Meta Description field in the All in One SEO Pack box for that Post or Page blank and let All in One SEO Pack create the Meta Description for you. Read our Meta Description documentation for additional information.
Run Shortcodes in Autogenerated Descriptions
This setting means will ensure that any shortcodes contained in the content used by All in One SEO Pack to autogenerate Meta Descriptions are run. This will ensure that content wrapped in shortcodes is picked up and the autogenerated Meta Descriptions more closely resemble the page content as it appears on the site.
Remove Descriptions for Paginated Pages
Remove Descriptions for Paginated Pages is an option that will help you avoid getting duplicate Meta Description warnings in Google Webmaster Tools. It is unchecked by default because this is not a major source of penalization. When you check this box, your Meta Description will only show on the first page of your paginated content and will be removed from all following paginated content pages. Read this documentation on WordPress.com about paginating content.
Never Shorten Long Descriptions
By default, All in One SEO Pack will truncate Meta Descriptions to 160 characters. This means that any text you enter in the SEO Descriptions fields in All in One SEO Pack will be shortened. If you wish to have All in One SEO Pack output your description intact without truncating it then check this box.
Unprotect Post Meta Fields
If you have created a Custom Field as an internal field using the underscore symbol ( _ ) in front of the field name the this option will make these fields available to both the user in the Custom Fields box of your Edit Post/Edit Page screen and to anything that uses XMLRPC such as the WordPress mobile applications. This effectively changes the field from private to public.
Exclude Pages
If you enter a comma separated list of Post or Page names in this field then All in One SEO Pack will not output any meta information whatsoever for that Page or Post. The All in One SEO Pack box wil still appear on the Edit Post/Page screen but whatever you enter will not be output to the source code of that Page or Post. The Page or Post will still appear in the XML Sitemap if you are using All in One SEO Pack Pro to generate your XML Sitemap.
Additional Post Headers
Whatever code you enter into this field will be output in the HEAD of all Posts. This field will accept HTML, JavaScript and jQuery. It will not accept PHP.
Additional Page Headers
Whatever code you enter into this field will be output in the HEAD of all Pages. This field will accept HTML, JavaScript and jQuery. It will not accept PHP.
Additional Front Page Headers
Whatever code you enter into this field will be output in the HEAD of the front page of your site. The front page is the page you set as a static page under Settings, Reading or the homepage if you have it set to display your latest posts. This field will accept HTML, JavaScript and jQuery. It will not accept PHP.
Additional Blog Page Headers
Whatever code you enter into this field will be output in the HEAD of your blog page for your site. The blog page is the page you set as a static page under Settings, Reading or your homepage if you have it set to display your latest posts. This field will accept HTML, JavaScript and jQuery. It will not accept PHP.